How do you replace carbon brushes?
Most appliances have motors, most motors have brushes, and the most common problem that causes a motor to stop working is worn brushes. If you know how to replace them, you can repair almost any engine and easily save hundreds of dollars. A washing machine motor costs around €50 to €100, while carbon brushes only cost €10.
Replacing carbon brushes sounds like something only a professional tech can do, but it sounds harder than it is. If you can replace a battery in your smoke alarm, you can also replace a carbon brush.
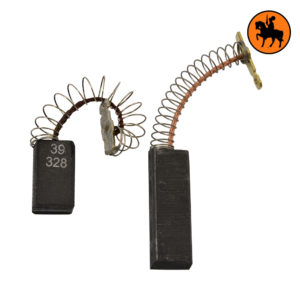
Below is an example of two carbon brushes:

On the right is a new carbon brush, on the left is a worn carbon brush. It looks like a worn out eraser.
To replace them, you need to do three things. You need to know which carbon brushes your motor needs, then you have to buy them (via Koolbrushes.nl) in order to be able to replace them.
HOW DO I FIND THE RIGHT CARBON BRUSHES FOR MY APPLIANCE?
When the brushes need to be replaced, they are worn out and it is therefore difficult to determine the original length. In this case it is best to look at the holder (the fixed part on the machine). The carbon brushes are usually 2 to 3 mm shorter than the holders. If the new ones are too big, they can easily be cut to size with a file or sandpaper. If you can’t figure it out, you can try the following options:
- Search for the device in Google and see if you can find the carbon brushes for the specific motor there.
- Use our carbon brush selection aid.
- Contact our customer service via email, telephone or whatsapp.
- You can contact the brand of the device and have them look it up for you.
10 STEPS TO REPLACE CARBON BRUSHES
- ALWAYS unplug the appliance before working on it.
- Wear gloves when replacing washing machine carbon brushes, which can be very dirty on the inside.
- With a washing machine you first have to remove the back before you can disconnect the motor.
- Loosen the bolts of the motor and then pull the motor off with a little wiggle. The engine doesn’t weigh much, so don’t worry about that.
- Take it to your workspace and look for the 2 carbon brushes. In the picture I point to where the 2 carbon brushes are. You can recognize the carbon brushes by the clips.
- Pull apart the electrical connection with your fingers or needle-nose pliers. The carbon brush is held in place by a small brass clip that must be moved out of place.
- Then give a little tug to pull out the old brush. Pay close attention to which direction the carbon brush came! It has a beveled edge and the new one should go in the same way it came out. Otherwise, the brushes on the commutator will rub the wrong way and will not work.
- Now it’s time to install the new carbon brush. Place the carbon brush in the hole you took it out of, making sure to position it the same way. Pushing the spring down takes some patience and fiddling, but just keep going and it will all go down. Then insert the clip into the slot.
- Reattach the electrical clip.
- And you’re done. Now replace the other carbon brush in exactly the same way.
The carbon brushes of power tools are more easily accessible through the housing. In some cases, the engine cover must be removed.
The following video also shows how easy it is to replace carbon brushes for a drill:
Can’t find the right carbon brushes? Feel free to contact us and we will be happy to help you!


